Pebble 源码剖析 - Skiplist
本章主要从源码角度来分析 Pebble 对 Skiplist(跳表)的高性能设计,对于跳表的介绍及原理可以参考 百科 或网上其他文章,本文不做冗余介绍。
数据结构
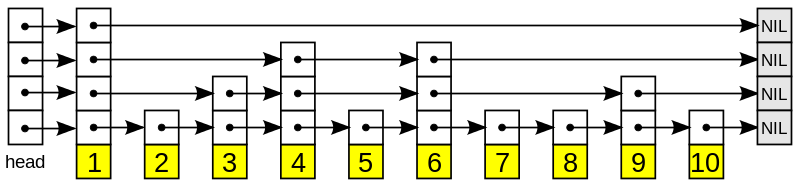
容易想到,跳表和普通链表类似,由多个节点组成,不同的是,每个节点有多层,因此会有多个 next 指针指向每层的下个节点,如下图:
跳表的逻辑结构很容易理解,使用链表这种数据结构实现非常直观。但是 Pebble 从高性能的角度出发,底层存储并未使用链表,而使用的是数组,通过 CAS 无锁技术,在并发场景下具备高效的性能。下面先来看看源码中几个关键的数据结构。
Skiplist
Skiplist 源码定义如下:
type Skiplist struct {
	arena  *Arena
	cmp    base.Compare
	head   *node
	tail   *node
	height uint32 // Current height. 1 <= height <= maxHeight. CAS.

	// If set to true by tests, then extra delays are added to make it easier to
	// detect unusual race conditions.
	testing bool
}

type Arena struct {
	n   uint64
	buf []byte
}
可以看到整个结构比较简单,arena 代表跳表数据存储的地方,是一个固定大小的 buffer;cmp 代表跳表内节点值的比较函数;head 为头节点;tail 为尾节点;height 代表跳表的高度(节点当前最大层数);testing 为测试时候使用,可以忽略。
node
再来看看里面核心结构 node 的定义:
type node struct {
	// Immutable fields, so no need to lock to access key.
	keyOffset uint32
	keySize   uint32
	valueSize uint32
	allocSize uint32
	tower [maxHeight]links
}

type links struct {
	nextOffset uint32
	prevOffset uint32
}
keyOffset 代表 key 在 arena 中的偏移,keySize 代表 key 的大小;valueSize 代表 value 的大小;allocSize 代表 node 占用的内存大小;tower 是一个数组,每个元素相当于每层的 pre-next 指针,指向各层的前一个节点和后一个节点。
可以看出 node 并未存储 key-value 的具体值,而是存的偏移和大小,value 的偏移并未存储,因为可以通过 keyOffset 和 keySize 间接计算出来。tower 比较形象,可以把节点看做塔一样,有多层,每层通过双向指针串联前后节点。因此 Skiplist 逻辑上是一个双向链表,Skiplist 在 Pebble 中的物理结构如下图:
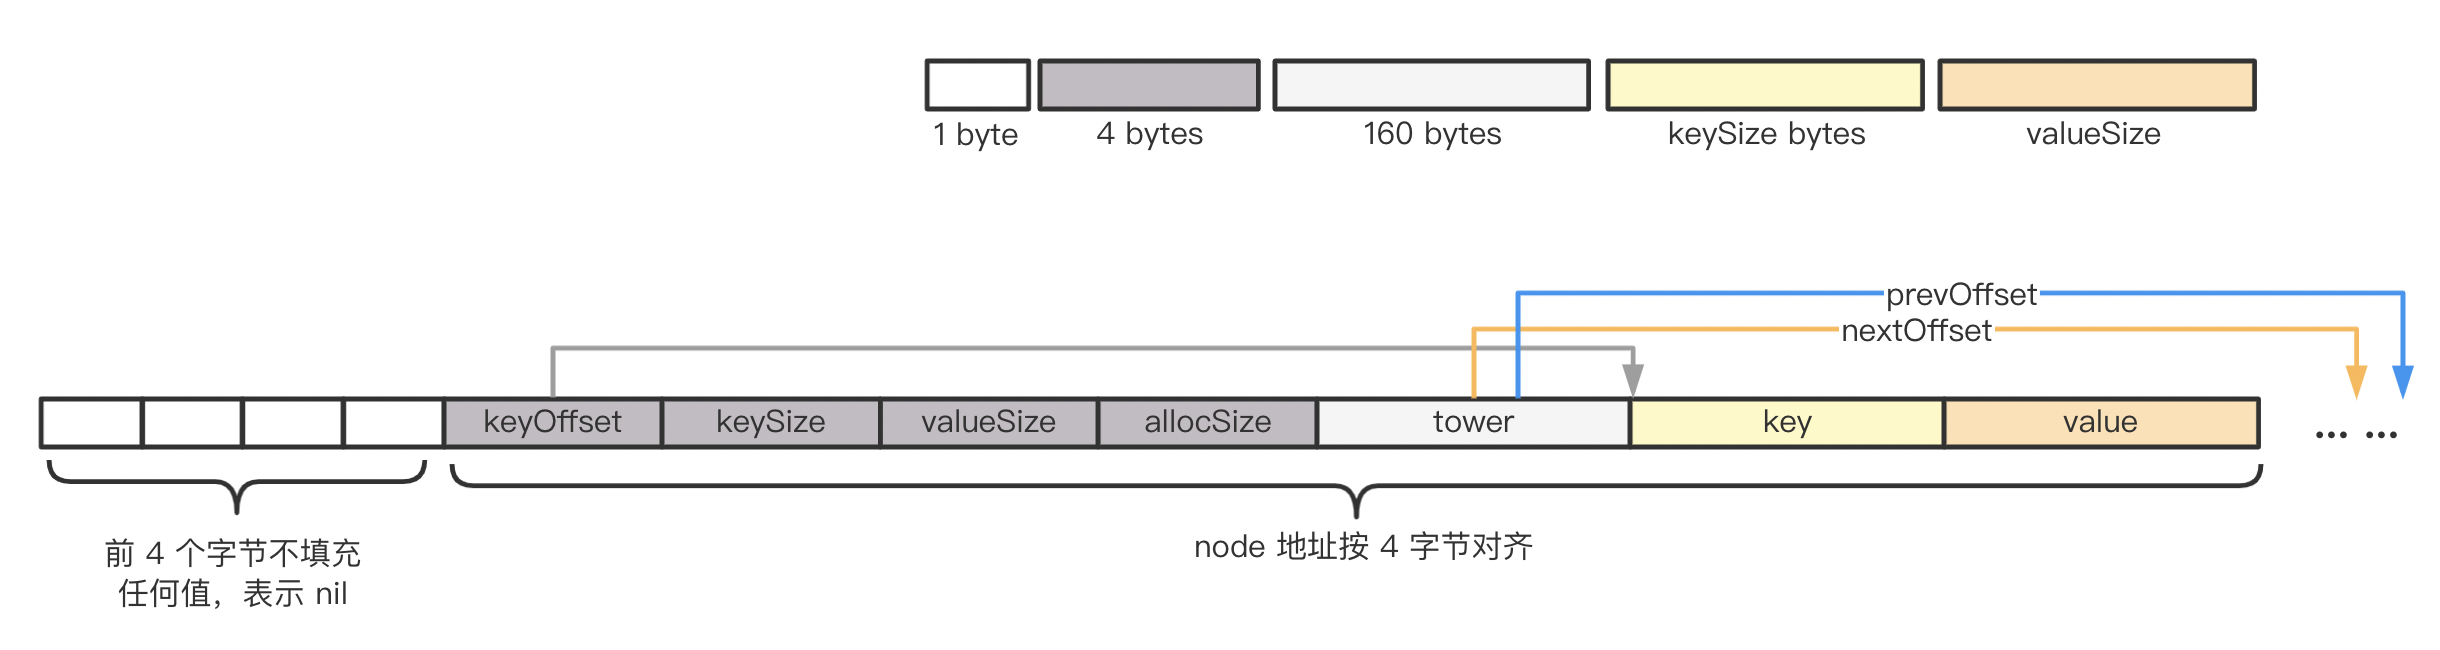
tower 指向的 node 个数有多个,图上只画了一对 link 表示节点在某层的前后节点偏移。
方法实现
了解 Skiplist 的数据结构定义后,接下来,看看如果操作 Skiplist,即 Skiplist 的相关方法实现。
创建跳表
func NewSkiplist(arena *Arena, cmp base.Compare) *Skiplist {
	skl := &Skiplist{}
	skl.Reset(arena, cmp)
	return skl
}
创建 Skiplist 时,需要由外部传入 arena 和 cmp,Skiplist 的容量和比较函数由使用者决定。这里会调用 Reset 对 Skiplist 进行初始化操作,来看看具体实现逻辑:
func (s *Skiplist) Reset(arena *Arena, cmp base.Compare) {
	// Allocate head and tail nodes.
	head, err := newRawNode(arena, maxHeight, 0, 0)
	if err != nil {
		panic("arenaSize is not large enough to hold the head node")
	}
	head.keyOffset = 0

	tail, err := newRawNode(arena, maxHeight, 0, 0)
	if err != nil {
		panic("arenaSize is not large enough to hold the tail node")
	}
	tail.keyOffset = 0

	// Link all head/tail levels together.
	headOffset := arena.getPointerOffset(unsafe.Pointer(head))
	tailOffset := arena.getPointerOffset(unsafe.Pointer(tail))
	for i := 0; i < maxHeight; i++ {
		head.tower[i].nextOffset = tailOffset
		tail.tower[i].prevOffset = headOffset
	}

	*s = Skiplist{
		arena:  arena,
		cmp:    cmp,
		head:   head,
		tail:   tail,
		height: 1,
	}
}
既然是初始化,那肯定是对 Skiplist 里面的成员变量进行初始化操作,arena 和 cmp 已经有了,很明显还需要对 head、tail、height 进行初始化赋值。首先通过 newRawNode 创建 head 节点和 tail 节点,由于 head 和 tail 不存储 key-value,因此 keyOffset 都初始化为 0,代表没有具体值;然后获取 head 和 tail 在 arena 中的偏移位置,并初始化 head.tower 的 nextOffset 和 tail.tower 的 prevOffset。
最后,Skiplist 中个成员变量初始化完毕,Skiplist 便算是创建成功了。接下来看看 newRawNode 的实现逻辑。
func newRawNode(arena *Arena, height uint32, keySize, valueSize uint32) (nd *node, err error) {
	// Compute the amount of the tower that will never be used, since the height
	// is less than maxHeight.
	unusedSize := uint32((maxHeight - int(height)) * linksSize)
	nodeSize := uint32(maxNodeSize) - unusedSize

	nodeOffset, allocSize, err := arena.alloc(nodeSize+keySize+valueSize, align4, unusedSize)
	if err != nil {
		return
	}

	nd = (*node)(arena.getPointer(nodeOffset))
	nd.keyOffset = nodeOffset + nodeSize
	nd.keySize = keySize
	nd.valueSize = valueSize
	nd.allocSize = allocSize
	return
}
newRawNode 会在 arena 中分配 node 所需内存大小,然后将成员变量的值存入 arena 中。由于节点的高度,即 tower 的层数小于等于 maxHeight,height 到 maxHeight 之间的 links 并不会使用,这里要计算出未使用的大小,然后再用节点最大大小减去未使用大小得到节点实际大小;
知道节点的大小后,便可以在 arena 中分配相应大小的内存空间,最后对 node 成员变量初始化,初始化的值则保存在 arena 中。
newRawNode 中分配 node 的内存时,采用 4 字节对齐,原因是 node 的每个变量都是 uint32(tower 元素中的成员变量也是),因此按 4 字节对齐时,cpu 访问内存获取变量值时更加高效,提升访存性能。字节对齐的好处可参考网上其他文章。
添加 key-value
func (s *Skiplist) Add(key base.InternalKey, value []byte) error {
	var ins Inserter
	return s.addInternal(key, value, &ins)
}

func (s *Skiplist) addInternal(key base.InternalKey, value []byte, ins *Inserter) error {
  // 找到 key 要插入的位置
	if s.findSplice(key, ins) {
		return ErrRecordExists
	}

	nd, height, err := s.newNode(key, value)
	if err != nil {
		return err
	}

  // node 在 arena 中的偏移
	ndOffset := s.arena.getPointerOffset(unsafe.Pointer(nd))

	var found bool
	var invalidateSplice bool
	for i := 0; i < int(height); i++ {
		prev := ins.spl[i].prev
		next := ins.spl[i].next

		if prev == nil {
			if next != nil {
				panic("next is expected to be nil, since prev is nil")
			}

			prev = s.head
			next = s.tail
		}

		for {
      // 获取 prev 和 next 的偏移
			prevOffset := s.arena.getPointerOffset(unsafe.Pointer(prev))
			nextOffset := s.arena.getPointerOffset(unsafe.Pointer(next))
			nd.tower[i].init(prevOffset, nextOffset)

			nextPrevOffset := next.prevOffset(i)
      // next 的 prevOffset 不指向 prevOffset
			if nextPrevOffset != prevOffset {
				prevNextOffset := prev.nextOffset(i)
        // prev 的 nextOffset 指向 next,说明 next 的 prevOffset 还没来得及修改
				if prevNextOffset == nextOffset {
					next.casPrevOffset(i, nextPrevOffset, prevOffset)
				}
			}

      // cas 修改 prev 的 nextOffset
			if prev.casNextOffset(i, nextOffset, ndOffset) {
        // cas 修改 next 的 prevOffset
				next.casPrevOffset(i, prevOffset, ndOffset)
				break
			}
      // cas 失败,说明其他线程成功插入节点,需要重新计算 key 插入的位置
			prev, next, found = s.findSpliceForLevel(key, i, prev)
			if found {
				if i != 0 {
					panic("how can another thread have inserted a node at a non-base level?")
				}

				return ErrRecordExists
			}
			invalidateSplice = true
		}
	}

	if invalidateSplice {
		ins.height = 0
	} else {
		for i := uint32(0); i < height; i++ {
			ins.spl[i].prev = nd
		}
	}

	return nil
}
我们主要关注 addInternal,该方法利用循环+CAS,在并发场景下可以高效地插入节点。首先通过 findSplice 方法找到要插入的位置,位置保存在 ins 的 spl 中,该变量存储了每层的前后节点。找到位置后,创建节点并保存 key-value 值,然后再 for 循环中遍历每层的 prev 和 next,将节点插入 pre 和 next 之间,如下:
+----------------+     +------------+     +----------------+
|      prev      |     |     nd     |     |      next      |
| prevNextOffset |---->|            |     |                |
|                |<----| prevOffset |     |                |
|                |     | nextOffset |---->|                |
|                |     |            |<----| nextPrevOffset |
+----------------+     +------------+     +----------------+
插入节点时,首先将 nd 的 prevOffset 和 nextOffset 指向 prev 和 next;然后通过 for+cas 修改 prev 的 nextOffset 再修改 next 的 prevOffset,如果修改成功,退出内存循环,继续处理下一层,否则重新计算 node 在当前层的插入位置,继续重试。
注意,这里在更新 prev 的 nextOffset 和 next 的 prevOffset 前会先修正 next 的当前 prevOffset,因为可能存在另一个线程正在插入的节点是 prev,而 prev 的 nextOffset 已经指向了 next,但是 next 的 prevOffset 还未来得及指向 prev。为了保证 cas 正确性,需要帮助另一线程将 next 的 prevOffset 指向 prev。
查找 key
Skiplist 的查找及遍历都是通过迭代器 Iterator 实现的,这里只列出最基础的查找方法:
func (it *Iterator) seekForBaseSplice(key []byte) (prev, next *node, found bool) {
	ikey := base.MakeSearchKey(key)
	level := int(it.list.Height() - 1)

	prev = it.list.head
	for {
		prev, next, found = it.list.findSpliceForLevel(ikey, level, prev)

		if found {
			if level != 0 {
				// next is pointing at the target node, but we need to find previous on
				// the bottom level.
				prev = it.list.getPrev(next, 0)
			}
			break
		}

		if level == 0 {
			break
		}

		level--
	}

	return
}
该方法逻辑非常简单,初始查找节点为 head,然后从最高层开始查找,如果找到目标节点(注:next 才是目标节点),则将 next 0 层的前一个节点赋给 prev(必须最底层才能代表真正的前节点);如果没有找到,则继续根据 prev 节点查找下一层,直到 0 层如果还未找到,说明目标值不存在。
我们继续看下 findSpliceForLevel 的逻辑:
func (s *Skiplist) findSpliceForLevel(
	key base.InternalKey, level int, start *node,
) (prev, next *node, found bool) {
	prev = start

	for {
		// Assume prev.key < key.
		next = s.getNext(prev, level)
		if next == s.tail {
			break
		}

		offset, size := next.keyOffset, next.keySize
		nextKey := s.arena.buf[offset : offset+size]
		n := int32(size) - 8
		cmp := s.cmp(key.UserKey, nextKey[:n])
		if cmp < 0 {
			// We are done for this level, since prev.key < key < next.key.
			break
		}
		if cmp == 0 {
			// User-key equality.
			var nextTrailer uint64
			if n >= 0 {
				nextTrailer = binary.LittleEndian.Uint64(nextKey[n:])
			} else {
				nextTrailer = uint64(base.InternalKeyKindInvalid)
			}
			if key.Trailer == nextTrailer {
				// Internal key equality.
				found = true
				break
			}
			if key.Trailer > nextTrailer {
				// We are done for this level, since prev.key < key < next.key.
				break
			}
		}

		// Keep moving right on this level.
		prev = next
	}

	return
}

func (s *Skiplist) getNext(nd *node, h int) *node {
	offset := atomic.LoadUint32(&nd.tower[h].nextOffset)
	return (*node)(s.arena.getPointer(offset))
}
从 start 节点开始(start.key < key),获取 next 节点,getNext 内部通过原子操作获取 next 的偏移,有了偏移便可通过 arena 获取 buffer 中的 nextKey,然后比较 key 和 nextKey 的原始值(去掉 key 的后 8 位 Trailer,key 的格式参考之前的文章),如果 userKey 相等,接着比较 Trailer,如果相等,则找到目标节点;Trailer 越大,说明 key 越小(Trailer 大说明版本更新,应该排在前面),如果 key 的 Trailer 大于了 nextTrailer,那就每必要往后找了,因为后面的 Trailer 更小,反之,继续遍历下一节点。
到这里,暂且介绍完了 skiplist 最基本的方法 – 创建、添加、查找,根据方法的实现可以帮助大家更清晰的认识 Pebble 对 Skiplist 的实现原理及使用方式。
总结
本文主要通过对源码解析,介绍了 Pebble 如何实现一个高性能无锁的 Skiplist,并介绍了 Skiplist 的几种最基本的方法,便于加深大家对 Skiplist 的理解,也利于后续源码探索。